Installation
Laminate /SPC/LVT/WPC Installation
Read enclosed detailed installation instructions before beginning install.
Subfloor leveling is a must!
Proper moisture testing is a must!
Proper expansion spacing around all permanent structures is a must!
Molding, trim, transition and finishing pieces must not prevent the floor from floating.
Failure to follow enclosed installation instructions will void warranty.
Acclimation may be required in extreme circumstances.
Please Read All lnstructions, Carefully, Before You Begin Installation.
lmproper lnstallation Will Void Warranty

Installation
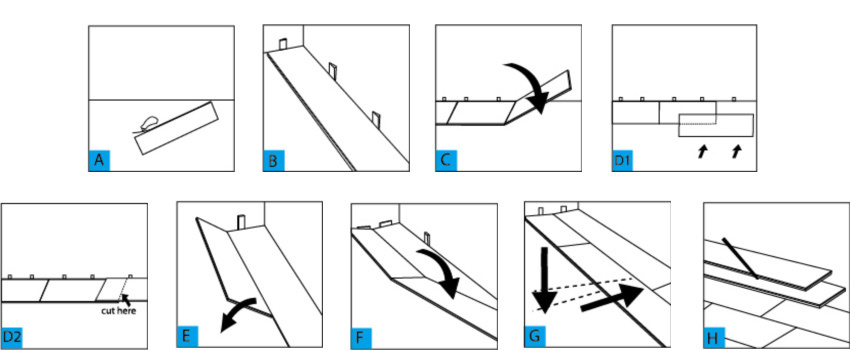
Remove the tongue (on the long side) from the first row of planks. This will ensure that the decorative surface of the flooring is under the finished trim when installed. Use a utility knife to score through the tongue several times until it easily snaps off (Figure A).
Note: The first row of planks may need to be trimmed lengthwise for a better fit at the end of the installation. Measure the room and divide by the width of the plank. If there is a remainder of less than 2”, the first row will need to be trimmed by that amount.
Starting in the left hand corner, place the first plank with its trimmed side towards the wall. Use spacers along each wall to maintain an expansion gap of 1/4” (7-8mm) between the wall and the flooring (Figure B).
Attach the ends of the 1st plank and the second plank by lifting the 2nd plank and inserting the tongue on the short side into the groove of the first plank and lowering it into place. Line up edges and corners carefully (Figure C).
Continue along the wall until you reach the last full plank, connecting each plank in manner described above. To fit the last plank, turn plank over (face down). Place the plank in the corner so the tongue on the short end touches the adjacent wall. Measure overlap between the installed plank and the last plank (Figure D1 & D2).
Using a sharp utility knife and a straight edge, score a line on the top surface of the plank. The plank should split on the score line with little effort. Use saw to cut plank to size.
Note: the end pieces must be longer than 8”. This may require cutting a plank to start a row depending on the size of the room.
Begin the next row with the cut off piece from the previous row to create the necessary stagger pattern. This piece should be a minimum of 8” (20cm) long and the joint offset from the previous row should be at least 10” (26cm) apart. To attach, tilt the plank you are installing slightly upwards (about 15-25º), insert its tongue into the previous row’s groove and lower it into place. The plank will click into place with light pressure (Figure E).
Install the second plank in the second row by inserting the short end tongue into the previously installed plank’s groove. Align the plank so that the long side tongue tip is positioned just over the groove lip of the plank in the first row (Figure F). Working from the end seam, at a low angle, insert the long tongue into the groove of the adjoining plank. Very little force is required to fit the tongue into the groove. You should be able to feel the tongue lock into the groove (Figure G). Continue locking each piece into place, short side first and then long side.
To fit the last row, lay a plank on top of the previous row. With the plank against the wall, mark a line down the length of the plank and cut the planks accordingly (Figure H).
Door Frames and heating vents also require expansion room. Cut the planks to the correct length. Place the cut plank next to its actual position, use a ruler to measure the areas to be cut out and mark them. Cut out the marked points allowing the necessary expansion distance on each side. T-molding is suggested in all doorways.
You can trim doorframes by turning a panel upside down to use as a height guide. Using a handsaw, cut door frames to the necessary height so that planks slide easily under them.
To finish the perimeter of the room, install quarter round molding using finishing nails. Nail quarter round directly into the baseboard not the flooring.
Tools and Supplies Required
1. Circular Saw
2. Safety Glasses
3. ¼” spacers
4. Utility Knife
5. Straight Edge Ruler or T-Square
6. Pencil
7. Tape Measure
8. Underlayment
If existing baseboard molding is difficult to remove, Quarter Round molding will be required to cover the expansion space need between flooring and baseboard.
Suitable Types Of Sub Floors And Floor Preparation
The sub floor must be flat, dry and clean. Carpet staples or glue residue must be removed and floor must be clean to ensure proper installation.
To check for flatness, hammer a nail into the center of the floor. Tie a string to the nail and push the knot against the floor. Pull the string tight to the farthest corner of the room and examine the floor for any high/lows relative to the string. Subfloor must be flat to 1/8” per 6’ (3mm per 0.92 meter).Any unevenness in excess of the flatness specification must be sanded down or filled with appropriate leveler.

 shuyi.li@dzfloors.com
 +86-13851662152


 shuyi.li@dzfloors.com
 +86-13851662152
 Message
